From Localhost to a Live Website: My Complete Azure Deployment Journey
- #azure
- #docker
- #linux
- #ssh
- #mongodb atlas
- #nginx
- #deployment
- #https
- #devops
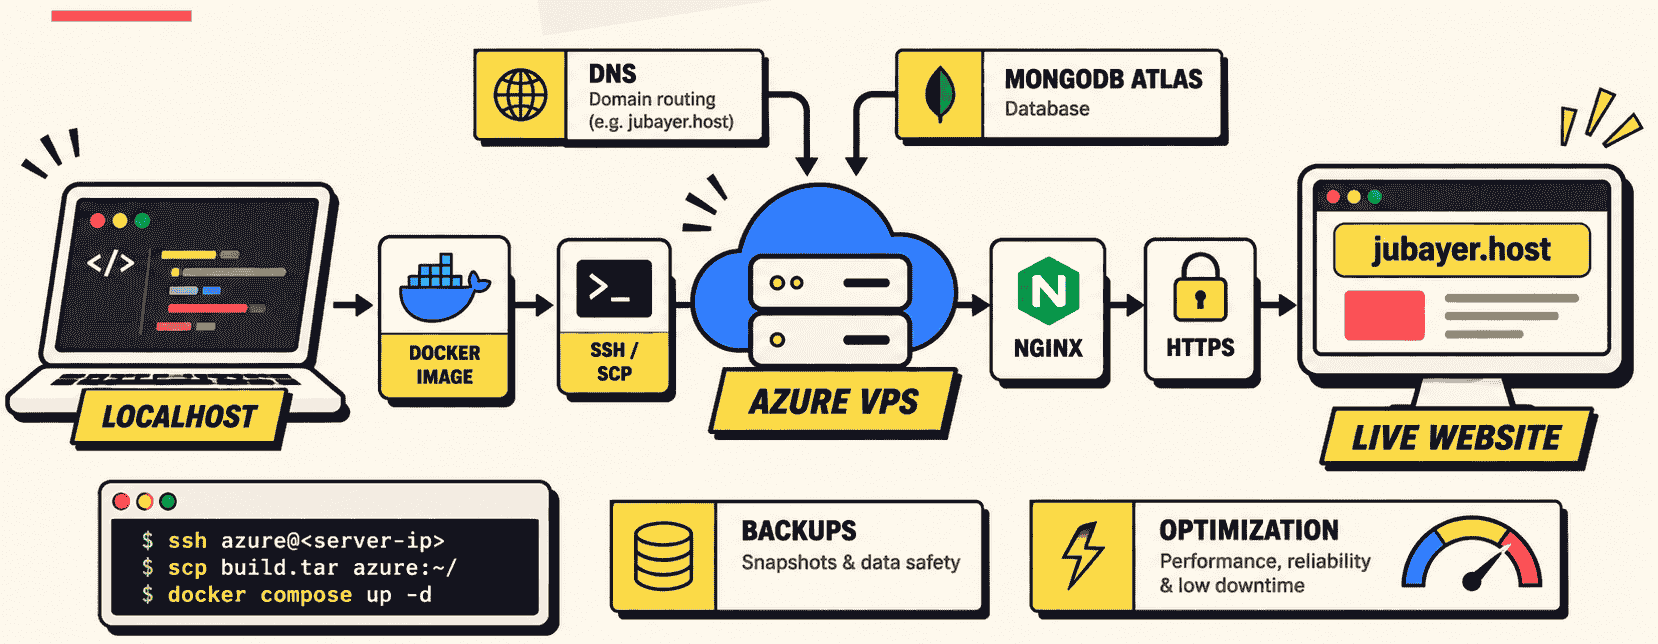
How I deployed my Spring Boot portfolio on Azure using Docker, MongoDB Atlas, SSH, Nginx, Hostinger DNS, and Let's Encrypt — including the commands, mistakes, fixes, performance improvements, and backups.
After completing the development of my portfolio website, I reached a new challenge:
How do I make a website that works on my laptop available to anyone on the internet?
Until this point, most of my work had been local development. I could run Spring Boot, open the browser, and use the application.
But a public website needs much more than working code.
It needs a server, a production database, a deployment method, secure configuration, domain routing, HTTPS, persistent file storage, and a plan for handling failures.
I decided to deploy the website using my Azure for Students account, which provided an initial student-credit budget.
This post documents the actual deployment journey, including the problems I encountered and how I solved them.
My finished website is available at https://jubayer.host.
This is the second part of my portfolio series. The first part explains the website's development and backend features.
01. Understanding the Complete Deployment Architecture
Before touching the server, I needed to understand how the different services would communicate.
Here is the final architecture:
             VISITOR
                |
                | HTTPS
                v
         jubayer.host
         Hostinger DNS
                |
                v
       Azure Public IP
         20.210.88.77
                |
                v
         Azure Network
         Security Group
                |
         Ports 80 / 443
                |
                v
              Nginx
          Reverse Proxy
                |
                v
        127.0.0.1:8080
                |
                v
       Docker Container
         Spring Boot
                |
                | Database connection
                v
          MongoDB Atlas


  Azure Persistent Storage
                |
                v
        /app/data/uploads
        /app/data/cv
Each component has a specific responsibility.
Hostinger DNS: Connects the domain name to the server's public IP address.
Azure VPS: The virtual Linux computer running the application.
Azure Network Security Group: Controls which network connections are allowed into the server.
Nginx: Accepts public HTTP/HTTPS requests and forwards them to Spring Boot.
Docker: Runs the packaged Spring Boot application.
MongoDB Atlas: Stores projects, posts, research, skills, messages, and other content.
Persistent storage: Keeps uploaded images and CV files outside the container.
Let's Encrypt: Provides an HTTPS certificate.
One important point: I used manual Docker deployment through SSH and SCP. I did not implement a GitHub Actions CI/CD pipeline for this deployment.
I'll explain the difference later.
02. Preparing the Application Before Deployment
The first step wasn't creating the Azure server.
It was making sure the application and its data were ready.
My website initially had data stored in a local H2 database. That worked during development, but I decided to use MongoDB Atlas for the deployed version.
I couldn't simply discard the previous database.
It contained actual information that needed to remain available.
The important rule was: Never experiment with the only copy of your data.
Before attempting migration, I backed up:
- The existing application files.
- The original H2 database.
- Uploaded project images.
- Other persistent application files.
I kept the original database untouched and prepared a separate copy for migration.
The local H2 file used the .mv.db extension.
A simplified example of the backup idea:
# WHERE: Mac Terminal

mkdir -p "$HOME/Desktop/Portfolio-Backup"

cp /path/to/original/portfolio.mv.db \
   "$HOME/Desktop/Portfolio-Backup/"
Replace the sample source path with the location of your own database.
Why was this necessary?
If the migration failed, I could inspect the problem without losing the original website data.
This was one of the most important precautions of the entire process.
03. Migrating from H2 to MongoDB
Moving to MongoDB involved more than changing a database connection string.
The application had to use MongoDB-compatible domain mapping and repositories instead of relying on the previous JPA/H2 persistence setup.
Once the source was prepared, the migration process had three parts:
- Test the application against local MongoDB.
- Copy the old H2 records into a temporary MongoDB database.
- Import the verified records into MongoDB Atlas.
I deliberately avoided migrating directly into production without testing first.
Problem: Dozens of tests failed
During the MongoDB conversion, an early test run produced 75 errors across a suite of 88 tests.
At first, this looked like many unrelated problems.
But most of those failures came from shared application startup issues.
One problem involved a Spring bean dependency cycle related to MongoDB entity preparation and the MongoDB template.
The relevant dependency chain was effectively:
MongoEntityPreparation
          |
          v
MongoOperations / MongoTemplate
          |
          v
Mongo Mapping Converter
          |
          v
MongoEntityPreparation
The fix involved resolving the MongoDB operations dependency lazily instead of forcing Spring to construct it too early.
Another issue was simpler: the application expected MongoDB on port 27017, but the local database wasn't running.
Lesson: When many tests fail at once, look carefully at the first shared error. It may explain dozens of later failures.
04. Running a Local MongoDB Test Container
I used Docker on my Mac to run a disposable MongoDB instance.
WHERE: Mac Terminal
docker run -d \
  --name jubayer-mongo-test \
  -p 127.0.0.1:27017:27017 \
  mongo:8.0
This command:
- Starts MongoDB 8.0 in Docker.
- Names the container
jubayer-mongo-test. - Exposes the database through the Mac's localhost address.
- Avoids publicly exposing the database port.
If the container already exists, don't create another one with the same name.
Check it first:
# WHERE: Mac Terminal

docker ps --filter name=jubayer-mongo-test
If it exists but is stopped:
# WHERE: Mac Terminal

docker start jubayer-mongo-test
Next, I ran the application tests against local MongoDB.
WHERE: IntelliJ IDEA Terminal on Mac
MONGODB_URI="mongodb://127.0.0.1:27017/jubayer_test_optimization" \
MONGODB_DATABASE="jubayer_test_optimization" \
APP_MIGRATION_FROM_H2=false \
SEED_DEMO_DATA=false \
./mvnw clean test
Why use a separate test database?
Because automated tests can create, update, and delete data.
Running those operations against the production Atlas database would be dangerous.
Eventually, the test suite passed, and I could continue with migration.
05. Preparing MongoDB Atlas
I created a MongoDB Atlas project and a free MongoDB cluster.
My Atlas application database was named:
jubayer_portfolio
I configured a database user with read/write permissions for that application database.
I also had to configure MongoDB Atlas Network Access.
This is a security feature that restricts which IP addresses can connect to the cluster.
I allowed the trusted connection addresses needed for migration and deployment.
Important: I did not open Atlas to every address using 0.0.0.0/0.
I also kept my database username and password outside the source code.
The intended database collections did not need to be created manually. The application and migration process created them when data was written.
The migration strategy
I first ran the migration against a local MongoDB database.
WHERE: IntelliJ IDEA Terminal on Mac
MONGODB_URI="mongodb://127.0.0.1:27017/jubayer_migration_trial_20261031" \
MONGODB_DATABASE="jubayer_migration_trial_20261031" \
SEED_DEMO_DATA=false \
APP_MIGRATION_FROM_H2=true \
APP_MIGRATION_H2_BASE="$HOME/Desktop/Jubayer-Migration-Test/portfolio" \
SPRING_MAIN_WEB_APPLICATION_TYPE=none \
java -jar target/portfolio-1.0.0.jar
This command used the migration-enabled application JAR built with:
# WHERE: IntelliJ IDEA Terminal on Mac

./mvnw -Pmigration -DskipTests package
The key settings were:
APP_MIGRATION_FROM_H2=trueenabled the one-time migration.APP_MIGRATION_H2_BASEpointed to my copied H2 database, without the.mv.dbextension.SEED_DEMO_DATA=falseprevented additional sample data from being inserted.SPRING_MAIN_WEB_APPLICATION_TYPE=noneran the migration without starting the website.
This was a one-time data migration, not something the production container should repeat at every startup.
I verified the local migration before proceeding.
Initial migration results
The records transferred were:
- Profiles: 1
- Projects: 4
- Publications: 3
- Experiences: 5
- Skills: 23
- Blog posts: 8
- Contact messages: 0
Total: 44 content records.
These were the original migration counts, not a permanent limit on the content.
Later database backups included new contact messages and internal ID-counter documents.
06. My First MongoDB Atlas Connection Problem
When I tried to connect to Atlas, I encountered a TLS/SSL connection error.
Part of the message suggested checking the MongoDB Atlas Network Access List.
Instead of immediately changing database credentials or rebuilding the application, I checked my public IP address.
WHERE: Mac Terminal
curl -4 -s https://api.ipify.org && echo
This displayed my current public IPv4 address.
I discovered that my internet connection's public IP had changed since I originally configured the Atlas allowlist.
Atlas still contained the previous IP.
The fix:
- Open MongoDB Atlas.
- Navigate to Security / Network Access.
- Find the outdated Mac IP entry.
- Update it to the current public IP.
- Wait until the entry becomes Active.
- Retry the connection.
After correcting the allowlist, the connection succeeded.
Lesson: A database connection error does not always mean the password is wrong or the database is down. Network restrictions can cause similar symptoms.
07. Another Mistake: Entering the Wrong Value
I made another simple mistake while setting the Atlas connection URI.
The Terminal prompted me to paste the complete MongoDB Atlas URI.
Instead, I initially entered my Mac login password.
Those are completely different things.
The Atlas URI looks conceptually like:
mongodb+srv://USERNAME:PASSWORD@CLUSTER_HOST/DATABASE
This is only an example format. Never publish a real connection URI.
I cleared the incorrect variable and entered the proper URI.
WHERE: Mac Terminal (zsh)
unset ATLAS_URI

read -rs "ATLAS_URI?Paste complete MongoDB Atlas URI: "
echo

export ATLAS_URI
Then I checked that the value started with a valid MongoDB connection prefix:
# WHERE: Mac Terminal

case "$ATLAS_URI" in
  mongodb+srv://*|mongodb://*)
    echo "Atlas URI: VALID PREFIX"
    ;;
  *)
    echo "Atlas URI: INVALID PREFIX"
    ;;
esac
This check doesn't prove the credentials work. It only catches an obviously incorrect value.
After separately verifying the connection and database access, I performed the actual Atlas migration using the copied H2 database.
A strange problem after migration
The migration logs reported success, but a later verification command displayed:
profiles: 0
projects: 0
publications: 0
experiences: 0
skills: 0
blog_posts: 0
TOTAL: 0
For a moment, it looked like the data had disappeared.
But the real problem was that I had closed and reopened Terminal.
The temporary ATLAS_URI environment variable was no longer present.
The verification command had therefore checked the wrong MongoDB target.
After restoring the correct URI and repeating the verification, Atlas returned all 44 expected records.
Lesson: Before assuming data is missing, confirm exactly which server and database your command is connected to.
And remember: temporary environment variables disappear when their shell session ends.
08. Preparing the Azure Virtual Machine
My next challenge was hosting Spring Boot on Azure.
I used an Azure for Students account with student credits.
The machine was an Ubuntu Linux VPS named jubayervps.
My verified VPS configuration was:
- Operating system: Ubuntu 22.04.5 LTS.
- CPU: 2 vCPUs.
- Processor architecture: x86_64 / AMD64.
- RAM: approximately 891 MiB.
- Storage: approximately 62 GB usable.
- Available storage at the time: around 60 GB.
- Swap: disabled.
- Azure region: Japan East.
The application database was hosted separately through MongoDB Atlas in India Central.
A misunderstanding about server resources
Initially, I thought the VPS had only 1 GB of storage.
But that wasn't correct.
It had approximately 1 GB RAM and 62 GB disk storage.
These are very different resources.
RAM is used while applications are running.
Disk storage keeps Docker images, uploaded files, logs, and other data.
That distinction mattered because I needed to be careful about memory usage, not disk capacity.
Checking the VPS
WHERE: Mac Terminal
ssh YOUR_USER@YOUR_AZURE_PUBLIC_IP
For my deployment, I connected using the Azure SSH user and the VM's public IP.
Once connected, my Terminal prompt changed to:
jubayer@jubayervps:~$
That told me I was inside the Azure VPS rather than my Mac.
WHERE: Azure VPS Terminal
uname -m
nproc
free -h
df -h /
lsblk -o NAME,SIZE,TYPE,MOUNTPOINTS
uptime
These commands provided the CPU architecture, CPU count, memory usage, available disk space, disk structure, and current system load.
An SSH mistake I made
I initially tried running a command through SSH that used sudo without an interactive terminal.
It produced an error similar to:
sudo: a terminal is required to read the password
The SSH connection itself was working.
The issue was that sudo couldn't prompt for a password in that command.
Fix: I connected to the VPS interactively first and ran the sudo command inside the SSH session.
Lesson: Know where a command runs. A Mac Terminal command and an Azure VPS command may look identical, but they operate on different computers.
09. Why I Built Docker Images on My Mac
The Azure VPS had very limited RAM.
Building a Spring Boot application directly on that machine could consume unnecessary memory.
I decided to build the Docker image on my Mac and transfer the finished image to Azure.
But there was another issue.
My MacBook uses Apple Silicon (ARM64), while my Azure VPS uses AMD64.
A Docker image built for the wrong architecture might not run correctly on the server.
So I explicitly built for AMD64.
WHERE: IntelliJ IDEA Terminal on Mac, inside the project folder
docker buildx build \
  --platform linux/amd64 \
  --load \
  -t jubayer-portfolio:azure .
Here's what mattered:
docker buildx buildstarts a Docker build.--platform linux/amd64targets the Azure server architecture.--loadputs the image in my local Docker image store.-t jubayer-portfolio:azuregives the image a recognizable name and tag..means Docker uses the current project directory as its build context.
Why a multi-stage Dockerfile?
I used a multi-stage Docker build.
The idea is simple:
Stage 1: Build application
        ↓
Maven + Java compiler
        ↓
Spring Boot JAR file

Stage 2: Run application
        ↓
Java runtime
        ↓
Final Docker image
The important parts of the Dockerfile were:
FROM maven:3.9-eclipse-temurin-26 AS build

# Compile the application

FROM eclipse-temurin:26-jre

# Copy the built JAR

USER portfolio

EXPOSE 8080

ENTRYPOINT ["java", "-jar", "/app/app.jar"]
This is an illustrative excerpt, not the complete Dockerfile.
The final image doesn't need Maven to run the application.
I also configured the application to run as a non-root user.
This reduced unnecessary runtime privileges.
I used .dockerignore to exclude local databases, uploaded files, private environment files, keys, and other unnecessary content from the Docker build context.
Lesson: A Docker image should contain what the application needs to run, not a complete copy of every file from your development computer.
10. Exporting the Docker Image
After successfully building the image, I needed to move it to Azure.
Instead of introducing Docker Hub or an image registry for this deployment, I used a simple manual approach.
First, I exported the image.
WHERE: Mac Terminal
docker save jubayer-portfolio:azure | gzip \
  > "$HOME/Desktop/jubayer-portfolio-azure.tar.gz"
The exported compressed image was approximately 139 MB.
Then I transferred it through SSH using SCP.
WHERE: Mac Terminal
scp "$HOME/Desktop/jubayer-portfolio-azure.tar.gz" \
  YOUR_USER@YOUR_AZURE_PUBLIC_IP:/home/YOUR_USER/jubayer-portfolio/
SCP stands for Secure Copy.
It transfers files through SSH.
The transfer reached 100%.
Next, I logged into Azure and imported the image into the server's Docker Engine.
WHERE: Azure VPS Terminal
sudo docker load -i \
  ~/jubayer-portfolio/jubayer-portfolio-azure.tar.gz
I verified that the image existed:
sudo docker image ls jubayer-portfolio:azure
At this point, the application image was on Azure, but the website was not running yet.
11. Preparing Persistent Storage
One easy mistake during Docker deployment is forgetting that the container is not a permanent place to store important files.
If uploaded images are stored only inside a container's writable layer, replacing the container can cause those files to disappear.
My database already contained image URLs, but MongoDB did not contain the actual PNG files.
So I created persistent directories on Azure.
WHERE: Azure VPS Terminal
mkdir -p \
  ~/jubayer-portfolio/data/uploads \
  ~/jubayer-portfolio/data/cv
These directories were intended for:
- Uploaded project and post images.
- Uploaded CV files.
Then I transferred the existing four project images from my Mac backup.
WHERE: Mac Terminal
scp "$HOME/Desktop/Jubayer-Portfolio-data-backup/uploads/"*.png \
  YOUR_USER@YOUR_AZURE_PUBLIC_IP:/home/YOUR_USER/jubayer-portfolio/data/uploads/
All four images transferred successfully.
Another issue: File ownership
My Docker application runs using a non-root user named portfolio.
I verified its numeric user and group IDs.
WHERE: Azure VPS Terminal
sudo docker run --rm \
  --entrypoint id \
  jubayer-portfolio:azure
The result was:
uid=999(portfolio) gid=999(portfolio)
But the copied image files initially belonged to the human Azure SSH user.
I needed the application to have permission to access its storage folder.
So I changed ownership of only the application data directory.
WHERE: Azure VPS Terminal
sudo chown -R 999:999 \
  "$HOME/jubayer-portfolio/data"
Afterward, I verified the directory ownership.
Important: Don't use recursive ownership commands on random system directories. First confirm the exact path and the user that needs access.
I also learned that Ubuntu may display a different account name for UID 999 on the host. The numeric UID and GID are what matter for this Docker bind mount.
12. Keeping Database Credentials Secure
A deployed application needs database credentials and administrator authentication settings.
Those values should not be hard-coded into the Java source or included in a public GitHub repository.
I configured them separately on Azure.
The main environment variables were:
MONGODB_URI
MONGODB_DATABASE
ADMIN_PASSWORD
SEED_DEMO_DATA
SESSION_COOKIE_SECURE
THYMELEAF_CACHE
I created a protected environment file.
WHERE: Azure VPS Terminal
sudo install -o root -g root -m 600 \
  /dev/null /etc/jubayer-portfolio.env
Permissions 600 mean only the file owner can read and write it.
The file contained configuration in this form:
MONGODB_URI=YOUR_PRIVATE_ATLAS_URI
MONGODB_DATABASE=jubayer_portfolio
ADMIN_PASSWORD=YOUR_PRIVATE_ADMIN_PASSWORD
SEED_DEMO_DATA=false
SESSION_COOKIE_SECURE=true
THYMELEAF_CACHE=true
These are placeholders. Never copy the literal placeholder values into a production configuration.
I entered the real credentials privately and verified the permissions:
# WHERE: Azure VPS Terminal

sudo stat -c '%a %U:%G %n' \
  /etc/jubayer-portfolio.env
The expected result was:
600 root:root /etc/jubayer-portfolio.env
Lesson: Application credentials belong in protected configuration, not inside code, screenshots, tutorials, or Docker images.
13. Starting Spring Boot with Docker
Before starting the container, I checked whether Azure could reach MongoDB Atlas on the database port.
A successful TCP connection told me the network route was available, although it didn't prove authentication.
Then I started Spring Boot.
WHERE: Azure VPS Terminal
sudo docker run -d \
  --name jubayer-portfolio \
  --memory=600m \
  --memory-swap=600m \
  -e JAVA_TOOL_OPTIONS="-Xms64m -Xmx256m" \
  --env-file /etc/jubayer-portfolio.env \
  -p 127.0.0.1:8080:8080 \
  -v /home/jubayer/jubayer-portfolio/data:/app/data \
  jubayer-portfolio:azure
This was one of the most important commands in the deployment.
Here's what each part does.
--name jubayer-portfolio
Gives the container a readable name so it can be inspected and managed later.
--memory=600m
Limits the container to 600 MiB of memory.
My VPS had only about 891 MiB RAM, so I wanted to avoid the application using all available memory.
--memory-swap=600m
Sets the combined memory-and-swap allowance to the configured limit. The VM had no swap enabled.
JAVA_TOOL_OPTIONS="-Xms64m -Xmx256m"
Configures Java heap memory.
-Xmx256m limits the Java heap, but the whole Java process may use additional memory for other purposes.
--env-file
Loads private production settings without putting them directly in the Docker image.
-p 127.0.0.1:8080:8080
This was an important security decision.
It makes the Spring Boot port available only through the VPS's loopback address.
Visitors cannot directly access Spring Boot on port 8080 from the public internet.
-v ...:/app/data
Mounts the host's persistent storage into the application container.
This allows uploaded images to survive container replacement.
Verifying the container
I checked the Docker status:
# WHERE: Azure VPS Terminal

sudo docker ps -a \
  --filter name=jubayer-portfolio
The container showed a status of Up.
Then I tested Spring Boot directly:
# WHERE: Azure VPS Terminal

curl -sS -o /dev/null \
  -w 'HTTP: %{http_code}\n' \
  http://127.0.0.1:8080/
It returned:
HTTP: 200
This confirmed that the homepage was responding.
I also checked memory consumption:
# WHERE: Azure VPS Terminal

sudo docker stats --no-stream jubayer-portfolio
The application initially used approximately 198 MiB RAM while idle.
That was comfortably below the 600 MiB container limit.
Lesson: Don't assume a 1 GB VPS is automatically unusable. Measure what the application actually consumes, while remembering that low-memory servers still have limited capacity.
14. Checking Spring Boot and MongoDB Logs
A running Docker container does not automatically mean the website is healthy.
The Java process might be running while database operations are failing.
So I inspected the Spring Boot logs.
WHERE: Azure VPS Terminal
sudo docker logs --tail 100 \
  jubayer-portfolio
I looked for:
- Successful Spring Boot startup.
- MongoDB connection messages.
- Exceptions.
- Application errors.
The logs confirmed that Spring Boot had started successfully and connected to the MongoDB Atlas replica set.
The initial startup took approximately 6.945 seconds.
At this stage, the website worked locally on the Azure VPS, but I still needed to make it available through the public domain.
15. Installing Nginx
I decided to use Nginx as a reverse proxy.
Instead of exposing Spring Boot directly to the internet, Nginx would receive incoming traffic and forward it to the application.
The request path would be:
Visitor
   |
   v
Nginx :80 / :443
   |
   v
127.0.0.1:8080
   |
   v
Spring Boot
First, I checked whether Nginx was already installed and whether ports 80 and 443 were being used.
WHERE: Azure VPS Terminal
command -v nginx || echo "Nginx is not installed"

sudo ss -ltnp | grep -E ':(80|443|8080)\b' || true
Nginx wasn't installed, and the public web ports were available.
I installed it:
# WHERE: Azure VPS Terminal

sudo apt update
sudo apt install -y nginx
Then I checked its status:
nginx -v
sudo systemctl is-active nginx
The service returned:
active
16. Configuring the Nginx Reverse Proxy
I created a dedicated Nginx configuration for the domain.
WHERE: Azure VPS Terminal
sudo tee /etc/nginx/sites-available/jubayer.host > /dev/null <<'EOF'
server {
    listen 80;
    server_name jubayer.host;

    client_max_body_size 20M;

    location / {
        proxy_pass http://127.0.0.1:8080;
        proxy_http_version 1.1;

        proxy_set_header Host $host;
        proxy_set_header X-Real-IP $remote_addr;
        proxy_set_header X-Forwarded-For $proxy_add_x_forwarded_for;
        proxy_set_header X-Forwarded-Proto $scheme;
    }
}
EOF
Why did these settings matter?
listen 80accepts HTTP traffic.server_nameidentifies which domain the configuration belongs to.proxy_passforwards requests to Spring Boot.- The proxy headers preserve information about the original request.
client_max_body_sizeallows incoming requests large enough for application uploads, subject to the application's own limits.
I enabled the configuration:
# WHERE: Azure VPS Terminal

sudo ln -s \
  /etc/nginx/sites-available/jubayer.host \
  /etc/nginx/sites-enabled/jubayer.host
Then I tested it before reloading:
sudo nginx -t && sudo systemctl reload nginx
The result included:
syntax is ok
test is successful
Finally, I checked whether Nginx could reach Spring Boot:
curl -sS -o /dev/null \
  -w 'HTTP: %{http_code}\n' \
  -H 'Host: jubayer.host' \
  http://127.0.0.1/
The result was 200.
Lesson: Always test Nginx configuration syntax before reloading. A small configuration mistake can interrupt the website.
17. Opening the Correct Azure Ports
Even though Nginx was working, Azure's network settings initially allowed only SSH traffic through a custom inbound rule.
That meant the application could work on the server while remaining inaccessible to visitors.
I opened the Azure Portal and navigated to:
Virtual Machines → jubayervps → Networking → Network settings
Then I added an inbound rule with these values:
Name: Allow-Web-80-443
Protocol: TCP
Source: Any
Destination ports: 80,443
Action: Allow
Priority: 310
I kept the application port 8080 private.
The required network setup was:
- Port 22: SSH administration.
- Port 80: HTTP.
- Port 443: HTTPS.
- Port 8080: Not exposed publicly.
After creating the rule, I tested the server from my Mac.
WHERE: Mac Terminal
curl -sS --connect-timeout 10 -o /dev/null \
  -w 'Public HTTP: %{http_code}\n' \
  -H 'Host: jubayer.host' \
  http://20.210.88.77/
The result was:
Public HTTP: 200
Now I knew that the complete path through the internet, Azure rules, Nginx, and Spring Boot was working.
Lesson: When a site works on localhost but not from the internet, investigate the firewall and networking layer before changing the application.
18. Connecting My Hostinger Domain
I already owned the domain:
I wanted that domain to point to my Azure VPS.
My Azure public IPv4 address was:
20.210.88.77
The main DNS configuration I needed was:
Type: A
Name: @
Value: 20.210.88.77
TTL: 300
An A record connects a domain name to an IPv4 address.
Problem: Hostinger's ALIAS record
When I tried to add the A record, Hostinger returned an error:
RRset jubayer.host IN ALIAS must not
be used with A on the same name.
I discovered that the root domain already had an ALIAS record pointing to Hostinger.
I couldn't keep that conflicting ALIAS and add the new A record at the same name.
Fix:
- Open Hostinger hPanel.
- Go to Domain → DNS / Nameservers.
- Find the ALIAS record with name
@. - Remove only that conflicting ALIAS.
- Add the new A record pointing to the Azure IP.
Important: I preserved the existing email-related records, including MX, TXT, SPF, DKIM, and the mail configuration.
Changing website hosting shouldn't accidentally break email service.
19. DNS Propagation: A Lesson in Patience
After adding the correct A record, I immediately checked DNS.
WHERE: Mac Terminal
dig +short A jubayer.host
Nothing appeared.
I also tried querying a public DNS resolver:
dig @1.1.1.1 jubayer.host A \
  +noall +comments +answer
The result showed:
status: NOERROR
ANSWER: 0
This meant that the query was processed, but no A-record answer was returned.
I also checked the domain's nameservers:
dig +short NS jubayer.host
They pointed to Hostinger's DNS infrastructure.
At first, I wanted to keep troubleshooting immediately.
But I had just changed the DNS record, and Hostinger had warned that propagation could take time.
So I stopped making changes and allowed time for the DNS update.
Later, I checked again:
dig +short A jubayer.host
This time the result was:
20.210.88.77
The DNS record was now resolving correctly.
I then tested the domain through HTTP:
# WHERE: Mac Terminal

curl -sS -o /dev/null \
  -w 'HTTP: %{http_code}\n' \
  http://jubayer.host/
It returned:
HTTP: 200
One of my biggest lessons from this project: Not every temporary problem needs an immediate configuration change.
Sometimes the correct action is to verify the configuration and allow time for the system to update.
20. Enabling HTTPS with Let's Encrypt
At this stage, the website worked through HTTP.
But I didn't want visitors or the administrator accessing it over an unencrypted connection.
So I configured HTTPS using Let's Encrypt and Certbot.
WHERE: Azure VPS Terminal
sudo apt update
sudo apt install -y certbot python3-certbot-nginx
I verified Certbot:
certbot --version
Then I requested a certificate:
sudo certbot --nginx -d jubayer.host --redirect
This command tells Certbot to:
- Request a certificate for
jubayer.host. - Configure Nginx for HTTPS.
- Redirect HTTP traffic to HTTPS.
Another mistake: I accidentally canceled Certbot
Certbot asked for an email address used for certificate notices.
Instead of entering an email, I typed:
c
That meant Cancel.
Certbot stopped and explained that an email address was required.
Nothing was broken; the certificate request simply hadn't completed.
I reran the command, supplied my email, and accepted the necessary terms.
The next attempt succeeded.
Certbot reported that the certificate was issued and deployed to Nginx.
The certificate's expiry date was January 29, 2027, and automatic renewal was scheduled.
21. Verifying HTTPS and Automatic Redirection
I didn't stop after seeing the success message.
I tested the actual website.
WHERE: Azure VPS Terminal
curl -sS -o /dev/null \
  -w 'HTTPS: %{http_code}\n' \
  https://jubayer.host/
The result was:
HTTPS: 200
Then I tested the HTTP redirect:
curl -sS -o /dev/null \
  -w 'HTTP: %{http_code}\nRedirect: %{redirect_url}\n' \
  http://jubayer.host/
The result showed:
HTTP: 301
Redirect: https://jubayer.host/
This confirmed that visitors using HTTP were redirected to HTTPS.
I also tested the certificate renewal mechanism.
WHERE: Azure VPS Terminal
sudo certbot renew --dry-run
The result was:
Congratulations, all simulated renewals succeeded
This is useful because having a valid certificate today is different from knowing that the renewal process works.
Lesson: Verify security features through actual tests, not only installation messages.
22. Making Docker Start Automatically
My website was running successfully, but there was another concern.
What happens if the Azure VPS restarts?
Without a proper restart policy, the container might remain stopped after reboot.
So I configured Docker's unless-stopped restart policy.
WHERE: Azure VPS Terminal
sudo docker update \
  --restart unless-stopped \
  jubayer-portfolio
Then I verified it:
sudo docker inspect \
  --format '{{.HostConfig.RestartPolicy.Name}}' \
  jubayer-portfolio

systemctl is-enabled docker
The results were:
unless-stopped
enabled
This meant Docker was enabled to start with the server, and the portfolio container was configured to restart automatically unless it had deliberately been stopped.
Important: This doesn't make the website immortal. If the VPS is deleted, credits expire, the disk fails, or the database becomes unavailable, the website can still go offline.
But normal SSH logout, closing my laptop, or restarting my Mac would no longer affect the hosted website.
23. Verifying the Uploaded Images
The homepage and database were working, but I also needed to verify image storage.
Remember that MongoDB contained image references, while the actual PNG files were stored separately.
I tested the image URLs through HTTPS.
WHERE: Azure VPS Terminal
curl -sS -o /dev/null \
  -w 'HTTP: %{http_code}\nType: %{content_type}\n' \
  https://jubayer.host/media/YOUR_IMAGE_FILENAME.png
The real images returned:
HTTP: 200
Type: image/png
This confirmed that:
- Nginx could forward image requests.
- Spring Boot could serve uploaded images.
- The Docker volume was mounted correctly.
- The transferred files were accessible.
Afterward, I manually checked the admin dashboard, contact form, inbox, and public pages.
All of them worked.
At this point, the website was functional.
But I still had one noticeable issue.
It felt slow.
24. Diagnosing Slow Page Loading
The website was live, but navigation didn't feel fast enough.
Rather than immediately upgrading the Azure VM, I measured the response times.
First, I tested the public domain from my Mac.
WHERE: Mac Terminal
for i in 1 2 3; do
  curl -sS -o /dev/null \
    -w "Run $i | First byte: %{time_starttransfer}s | Total: %{time_total}s\n" \
    https://jubayer.host/
done
The homepage took around:
2.41 seconds
2.83 seconds
2.72 seconds
The average was approximately 2.59 seconds.
That was too slow for the experience I wanted.
Was the problem Nginx or Spring Boot?
To find out, I tested Spring Boot directly on the Azure VPS.
WHERE: Azure VPS Terminal
for i in 1 2 3; do
  curl -sS -o /dev/null \
    -w "Run $i | Time: %{time_total}s\n" \
    http://127.0.0.1:8080/
done
The average was approximately 1.56 seconds.
That meant a significant part of the delay happened before the response even left Spring Boot.
Was the server generally slow?
I tested a bundled static image.
# WHERE: Azure VPS Terminal

curl -sS -o /dev/null \
  -w 'Time: %{time_total}s\n' \
  http://127.0.0.1:8080/images/demo-trip.svg
The static file loaded in about:
0.003 seconds
That was much faster than the homepage.
This suggested that generating dynamic HTML was significantly more expensive than serving static files.
25. Discovering Repeated Database Requests
After reviewing the backend source, I found that the homepage was making repeated database requests for overlapping information.
For example, it needed projects for one section, project counts for another, research highlights, posts, and other statistics.
Some of that information could be reused instead of retrieving similar records repeatedly.
This mattered even more because:
- Azure VPS was in Japan East.
- MongoDB Atlas was in India Central.
Each database round trip could add network delay.
What I changed
I reorganized homepage data preparation so related content could be loaded and reused.
I also introduced a small cache for public database-derived content.
The important concept was:
@Cacheable(
    cacheNames = "publicContent",
    key = "'home.overview'"
)
The cache was configured with:
- A maximum of 64 entries.
- A 15-minute expiration.
- Cache invalidation when appropriate admin content changes were saved.
I deliberately avoided caching sensitive admin responses, contact messages, or rendered pages containing session-specific information.
I didn't modify the live server immediately
I made the changes in the project on my Mac.
Then I ran the automated tests using the disposable local MongoDB container.
Once the tests passed, I rebuilt the Docker image.
WHERE: IntelliJ IDEA Terminal on Mac
docker buildx build \
  --platform linux/amd64 \
  --load \
  -t jubayer-portfolio:optimized .
I exported the optimized image:
# WHERE: Mac Terminal

docker save jubayer-portfolio:optimized | gzip \
  > "$HOME/Desktop/jubayer-portfolio-optimized.tar.gz"
Then I transferred it to Azure using SCP and loaded it into Docker.
26. Replacing the Container Safely
I wanted to keep the original Docker image and container available in case the optimized version had problems.
Because the VPS had only about 1 GB RAM, I didn't want both full application containers running simultaneously.
So I used a controlled replacement process.
I stopped the old container, renamed it for rollback, and launched the new image.
The main idea was:
# WHERE: Azure VPS Terminal

sudo docker stop jubayer-portfolio

sudo docker rename \
  jubayer-portfolio \
  jubayer-portfolio-previous
Then I launched the optimized image with the same important settings:
sudo docker run -d \
  --name jubayer-portfolio \
  --restart unless-stopped \
  --memory=600m \
  --memory-swap=600m \
  -e JAVA_TOOL_OPTIONS="-Xms64m -Xmx256m" \
  --env-file /etc/jubayer-portfolio.env \
  -p 127.0.0.1:8080:8080 \
  -v /home/jubayer/jubayer-portfolio/data:/app/data \
  jubayer-portfolio:optimized
This caused a brief interruption during the switch.
I kept the old container stopped under a separate name so I had a rollback option.
I didn't delete the MongoDB data, images, Nginx configuration, or SSL certificate.
The result
The optimized homepage responded directly on Azure in approximately:
Run 1: 0.063 seconds
Run 2: 0.029 seconds
Run 3: 0.028 seconds
From my Mac over HTTPS, the new average was about 0.96 seconds, compared with 2.59 seconds before optimization.
That was roughly a 63% reduction in measured HTML response time.
Lesson: Measure first, identify the actual bottleneck, test a focused optimization, then compare the results.
27. Optimizing the Project Images
The backend was much faster, but project images still took noticeable time to load.
I inspected their dimensions.
The four original PNG files were approximately 2,830–2,936 pixels wide.
Together, they occupied about 9.3 MB.
For a portfolio layout, those images were larger than necessary for many typical displays.
I decided to create smaller versions while keeping the original filenames and aspect ratios.
WHERE: Mac Terminal
src="$HOME/Desktop/Jubayer-Portfolio-data-backup/uploads"
out="$HOME/Desktop/Jubayer-Portfolio-optimized-images"

mkdir -p "$out"

for f in "$src"/*.png; do
  sips -Z 1920 "$f" \
    --out "$out/$(basename "$f")" >/dev/null
done

du -sh "$src" "$out"
The result was approximately:
Original:  9.3 MB
Optimized: 5.1 MB
This was about a 45% reduction.
I opened the optimized images locally to check their appearance before replacing anything.
Preserving the original files
I transferred the smaller copies to a separate folder on Azure.
Then I backed up the existing live images.
WHERE: Azure VPS Terminal
sudo cp -a \
  ~/jubayer-portfolio/data/uploads \
  ~/jubayer-portfolio/uploads-original-backup
Only after confirming the backup existed did I replace the live image files and restore the required ownership.
sudo cp \
  ~/jubayer-portfolio/Jubayer-Portfolio-optimized-images/*.png \
  ~/jubayer-portfolio/data/uploads/

sudo chown 999:999 \
  ~/jubayer-portfolio/data/uploads/*.png
Because the filenames and database URLs stayed the same, no database migration was required.
The website also didn't need a Docker restart.
I verified the images through HTTPS, and all four returned 200 with the correct image/png content type.
The website felt noticeably faster afterward.
28. Backing Up MongoDB Atlas
After the website was running properly, I wanted a recoverable copy of the database.
A production website can change over time.
If I create another post, edit a project, or receive new messages, the database contains information that shouldn't be lost.
I used MongoDB's mongodump utility.
First, I verified that it was available inside my local MongoDB Docker container.
WHERE: Mac Terminal
docker exec jubayer-mongo-test mongodump --version
The installed version was:
mongodump version: 100.20.0
I then created a compressed backup archive on my Mac.
The process used a private Atlas URI, a temporary protected configuration file, and an archive saved to my Desktop.
WHERE: Mac Terminal
umask 077

mkdir -p "$HOME/Desktop/Jubayer-Portfolio-backups"

read -rs "ATLAS_URI?Paste your Atlas URI: "
echo

printf '%s\n' "$ATLAS_URI" |
docker exec -i jubayer-mongo-test sh -c '
  IFS= read -r uri
  cfg=$(mktemp)
  chmod 600 "$cfg"
  trap "rm -f $cfg" EXIT
  printf "uri: %s\n" "$uri" > "$cfg"

  mongodump \
    --config "$cfg" \
    --db jubayer_portfolio \
    --archive \
    --gzip
' > "$HOME/Desktop/Jubayer-Portfolio-backups/jubayer_portfolio_20261031.archive.gz"

result=$?
unset ATLAS_URI

echo "Backup exit status: $result"
The backup completed with:
Backup exit status: 0
The compressed archive was approximately 8.8 KB.
That small size was reasonable because the database mainly contained structured text and metadata.
By this stage, the backup also included new contact messages and an internal ID-counter collection.
Verifying the backup
I didn't want to keep a backup file without checking whether MongoDB could read it.
So I ran a dry-run restore.
WHERE: Mac Terminal
docker exec -i jubayer-mongo-test \
  mongorestore \
  --archive \
  --gzip \
  --dryRun \
  --verbose \
  < "$HOME/Desktop/Jubayer-Portfolio-backups/jubayer_portfolio_20261031.archive.gz"
MongoDB recognized the eight collections and reported:
dry run completed
0 document(s) restored successfully
0 document(s) failed to restore
The zero restored documents were expected because --dryRun doesn't actually import anything.
Lesson: Creating a backup file and verifying that it is readable are different steps.
A dry run is useful, although a full recovery plan should eventually include a restore test into a separate disposable database.
29. Backing Up Uploaded Images Separately
A database backup wasn't enough.
My website stores uploaded images and CV files separately on the Azure VPS.
If I lost those files, MongoDB could still contain the image URLs, but the actual images would be missing.
So I made a second backup.
WHERE: Mac Terminal
umask 077

scp -r \
  YOUR_USER@YOUR_AZURE_PUBLIC_IP:/home/YOUR_USER/jubayer-portfolio/data \
  "$HOME/Desktop/Jubayer-Portfolio-backups/azure-data-20261031"
This copied the persistent application data folder from Azure to my Mac.
The copied folder contained the optimized project images and the CV storage directory structure.
Important: These were one-time backups.
They do not automatically update when I publish new content.
A proper ongoing maintenance routine should include fresh backups after important changes and a securely stored second copy.
30. Manual Deployment vs CI/CD
One important thing I want to clarify is that I did not use a fully automated CI/CD pipeline for this deployment.
My actual deployment workflow was:
Edit code on Mac
        |
        v
Run tests locally
        |
        v
Build AMD64 Docker image
        |
        v
Export Docker image
        |
        v
Transfer using SCP
        |
        v
SSH into Azure
        |
        v
Load Docker image
        |
        v
Replace container
        |
        v
Verify website
This is a manual deployment workflow.
It was appropriate for a small personal project and helped me understand each stage directly.
A CI/CD pipeline would automate some of these steps.
For example, a future GitHub Actions workflow could:
- Run tests after source changes.
- Build the application.
- Create and publish a Docker image.
- Deploy an approved release.
- Run health checks.
- Support controlled rollback.
But automation also introduces responsibilities involving secrets, permissions, release approval, and failure handling.
I want to understand those properly before claiming that this website has an automated deployment pipeline.
What I learned: Manual deployment is valuable for learning the fundamentals. CI/CD becomes useful when those steps need to be repeated reliably and safely.
31. Problems I Faced and What Fixed Them
Here are the mistakes and problems I would want another beginner to know about.
1. Too many Spring Boot test errors
Problem: Many tests failed during MongoDB conversion.
Cause: Shared Spring context and MongoDB initialization problems.
Fix: Investigated the first startup error and corrected the dependency cycle before rerunning the suite.
2. MongoDB refused local connections
Problem: The application couldn't connect to 127.0.0.1:27017.
Cause: The local MongoDB container wasn't running.
Fix: Started the disposable Docker MongoDB instance.
3. Atlas connection failed
Problem: TLS/SSL errors appeared.
Cause in my case: The Mac's public IP changed while Atlas still allowed the old IP.
Fix: Updated the trusted IP entry and verified the connection.
4. Wrong value entered as database URI
Problem: Application couldn't interpret the connection string.
Cause: I entered a login password rather than the complete MongoDB URI.
Fix: Cleared the temporary variable and entered the correct connection string.
5. Database appeared empty after migration
Problem: A verification command returned zero records.
Cause: I had opened a new Terminal, losing the temporary Atlas URI variable.
Fix: Restored the URI and repeated verification against the correct database.
6. SSH command couldn't run sudo
Problem: sudo complained that a terminal was required.
Cause: The SSH command didn't provide an interactive password prompt.
Fix: Connected through SSH interactively before running administrative commands.
7. Confusion between storage and RAM
Problem: I thought the VPS had only 1 GB storage.
Cause: Confused system memory with disk capacity.
Fix: Used free -h and df -h to inspect them separately.
8. Docker architecture mismatch risk
Problem: Mac used ARM64 while the Azure server used AMD64.
Fix: Built the image with --platform linux/amd64.
9. Uploaded images needed separate transfer
Problem: Database image URLs alone weren't enough to display the files.
Fix: Transferred images into a persistent host directory and mounted it into Docker.
10. Docker file ownership was different
Problem: Host files weren't owned by the container's application UID.
Fix: Verified the container's UID/GID and corrected ownership only for the relevant data directory.
11. Public website wasn't reachable initially
Problem: Server worked locally but incoming web traffic wasn't allowed.
Cause: Azure inbound rules didn't yet allow ports 80 and 443.
Fix: Added an appropriate Network Security Group rule.
12. Hostinger rejected the DNS A record
Problem: An ALIAS record conflicted with the new A record.
Fix: Removed only the conflicting root-domain ALIAS and added the correct A record.
13. DNS didn't update immediately
Problem: dig returned no IP address.
Cause: The recently changed DNS record wasn't visible yet.
Fix: Verified nameservers and allowed propagation time rather than repeatedly changing configuration.
14. Certbot canceled the certificate request
Problem: HTTPS setup stopped.
Cause: I typed c at the email prompt.
Fix: Reran Certbot and completed the prompts.
15. Website navigation felt slow
Problem: Dynamic pages took noticeably longer than static files.
Cause: Repeated database operations were a significant contributor.
Fix: Consolidated data retrieval and introduced controlled public-content caching.
16. Images loaded slowly
Problem: Uploaded PNGs were unnecessarily large.
Fix: Resized copies, verified quality, backed up originals, and replaced the files without changing their URLs.
The common lesson behind all of these problems is:
Don't randomly change multiple things at once. Identify which layer is failing, verify it, apply one fix, and test again.
32. What I Check When Troubleshooting a Live Website
If the website becomes unavailable in the future, I don't want to immediately delete containers or rebuild the application.
I want to identify which part is failing.
First: Check from my Mac.
# WHERE: Mac Terminal

dig +short A jubayer.host

curl -sS -o /dev/null \
  -w 'HTTP: %{http_code}\n' \
  https://jubayer.host/
If DNS points to the correct server but HTTPS fails, I investigate the next layer.
Second: Connect to Azure.
# WHERE: Mac Terminal

ssh YOUR_USER@YOUR_AZURE_PUBLIC_IP
Third: Check the application.
# WHERE: Azure VPS Terminal

sudo docker ps -a \
  --filter name=jubayer-portfolio

sudo docker logs --tail 60 \
  jubayer-portfolio

curl -sS -o /dev/null \
  -w 'HTTP: %{http_code}\n' \
  http://127.0.0.1:8080/
Fourth: Check Nginx.
# WHERE: Azure VPS Terminal

sudo systemctl is-active nginx

sudo nginx -t
Fifth: Check server resources.
# WHERE: Azure VPS Terminal

free -h
df -h /

sudo docker stats --no-stream \
  jubayer-portfolio
These checks help distinguish:
- DNS problems.
- Internet/network-rule problems.
- Nginx problems.
- Docker/container problems.
- Spring Boot startup problems.
- MongoDB connection problems.
- RAM or disk pressure.
The rule is simple: Diagnose first, modify second.
33. What Happens When I Close My MacBook?
This was one of the final questions I wanted to understand.
Once the application is deployed on Azure, it doesn't depend on my laptop remaining turned on.
I can close:
- IntelliJ IDEA.
- My Mac Terminal.
- Docker Desktop on my Mac.
- Chrome.
- My laptop itself.
The website continues running because the application is hosted on the Azure VPS.
However, the Azure VM must remain available and running.
MongoDB Atlas must also remain accessible.
The domain must remain valid, and Azure student-credit availability still matters.
This is an important distinction between running an application locally and hosting it on a remote server.
34. What I Would Improve in the Future
The website is live and functional, but there are still optional operational improvements I would consider.
Automated deployment
I could introduce GitHub Actions after establishing a reliable source-control and release process.
Automatic backups
The existing database and uploaded-file backups are snapshots. Automated scheduled backups and tested recovery would reduce maintenance risk.
Monitoring
Uptime checks, resource monitoring, logs, and alerts would help detect problems early.
SSH hardening
SSH key authentication and more restrictive access rules could improve administrative security.
Geographic performance
The distance between the Azure server, the database, and visitors contributes to network latency. A better regional arrangement or CDN could help if future requirements justify it.
Additional domain configuration
The main domain jubayer.host is configured and verified. The separate www hostname was not included in the completed setup.
These are future possibilities, not features I am claiming to have already implemented.
35. The Biggest Lessons from This Deployment
This project changed how I think about deploying applications.
Before this experience, it was easy to think that deployment meant uploading code to a server.
Now I understand that deployment involves many interconnected systems.
A working Spring Boot application is only one part.
I also had to understand:
- Linux and remote server access.
- SSH and secure file transfer.
- Docker images and CPU architecture.
- Container memory limits.
- Persistent storage.
- MongoDB Atlas networking.
- Environment variables and secrets.
- Nginx reverse proxy configuration.
- Azure inbound network rules.
- Domain DNS records.
- HTTPS certificates and renewal.
- Debugging with logs and HTTP requests.
- Database and file backups.
- Performance measurement and optimization.
My most important lessons were:
1. Test locally before changing production.
2. Keep backups before migrations or file replacement.
3. Never put database passwords in public source code.
4. Separate application problems from networking and DNS problems.
5. Understand why a command is necessary before running it.
6. Measure performance before upgrading infrastructure.
7. Keep a rollback option when releasing changes.
8. Verify every important result instead of trusting a success message alone.
9. Document mistakes so they become useful knowledge.
10. Deployment isn't finished when the website first opens. It's finished when the application is usable, secure, recoverable, and maintainable.
Further Reading
If you're learning these topics and want deeper explanations, these official resources are useful:
- Docker Buildx and Multi-Platform Builds
- MongoDB Atlas IP Access Lists
- MongoDB Database Tools and Backups
- Nginx Beginner's Guide
- Certbot Documentation
- Spring Framework Caching
- Microsoft Azure Documentation
Final Thoughts
After going through development, database migration, server setup, Docker deployment, DNS configuration, HTTPS, troubleshooting, and optimization, my portfolio is finally live.
Website: https://jubayer.host
What I value most about this project isn't just the finished website.
It's the understanding I gained from making mistakes, investigating them, fixing them, and seeing how all the different parts of a real application work together.
I hope documenting the process helps someone else avoid the same mistakes and understand not just what command to run, but also why that command matters.
From localhost to a live website — that was my deployment journey.